We Needed to Vent…
No worries things are fantastic in the Little Blue House! The venting I am referring to is the next major obstacle in renovating our kitchen! The previous owner/builder/designer anticipated building an addition which included a kitchen and living room. While I think it would basically work, we decided to do something differently. What was originally intended to be the laundry room will be converted into a full kitchen. One of the first things I did with the house was to flip around some of the plumbing so the washing machine could be located in a space in the bathroom. The dryer however is a much more tricky proposition.

The before-ish shot. We have the dryer pulled out to evaluate what we need to do
In order to allow the hot air, water and lint from a dryer to not build up inside, you have to vent the dryer to the exterior of the house. While this can be a simple job, there are a couple of complications with this idea. First of all by code you may not use a flexible vent line (used to be super common) to run through the ceiling etc. Secondly you may not use more than 25′ of rigid venting from the dryer to the outside vent. You also must deduct 5′ for every 90 degree elbow joint you use. Now if your dryer is on an exterior wall this is no issue whatsoever. If you are in a single story house this is also not a big deal. In the case of the LBH however it is a two story structure with the washroom towards the center of the floor plan and lacking any forethought from the previous owner of how he would vent anything like the AC or bathroom fan.
What made matters even worse is the fact that the owner tried to cantilever part of the master bedroom balcony by switching the directions of the ceiling joists and adding a structural beam. It might have worked had he known the right proportions needed to create something like that but alas, the balcony had to be supported anyway and the ceiling joists are all messed up. After standing in the future laundry area scratching my head for about an hour I determined there was only one possible way to go and that was definitely pushing the length restriction.
So I set to work installing the vent. One of the first things you have to do is assemble the vent tubing by rolling them up so the edges come together then kinda pushing down on the seam in order to wedge the tab side into the slot side. This actually proved slightly tricky at first to get the hang of but I got it. I then proceeded to drill/cut holes in the rafter blocking and then after a little bit of a second thought, cut a 4.5″ hole in the side of my house! Talk about not being able to go back on something…I found a very nice quality rigid dryer vent that actually looks pretty good so I installed that from the outside of the house through the aforementioned new 4.5″ window in the side of our home. From the inside I decided to put a downward slope in the vent pipe in order to create a bit of drainage in case water ever condenses within the vent which I thought made a lot of sense. After my slopes were all set I assembled 15′ of the vent pipe and used band clamps to secure them then taped up all the seams and connections with TRUE duct tape. True duct tape is actually a foil tape that works a lot better than the plastic stuff, at least for sealing up vent pipes.

Clamped and taped dryer vent!
After some careful maneuvering and making an effort not to knock things off of our shelves by swinging around a 15′x4″ vent, I managed to slide the vent up through the proper ceiling joists, through the blocking and into the receiving tube on the outside vent. Success! From the laundry room side of things i had to cut part of the vent short, add a 90 degree elbow (also taped and clamped) and then run another 5′ of solid pipe down to the center of the dryer’s spot. Success! The vent pretty much lined up perfectly. I proceeded to use plumbers tape/strapping to secure and hang the vent in the ceiling as well as secure it to the wall a bit. While I dont’ have any photo of the finished product result, we ended up using 2′ of flex pipe just to make the connection to the dryer a lot easier.
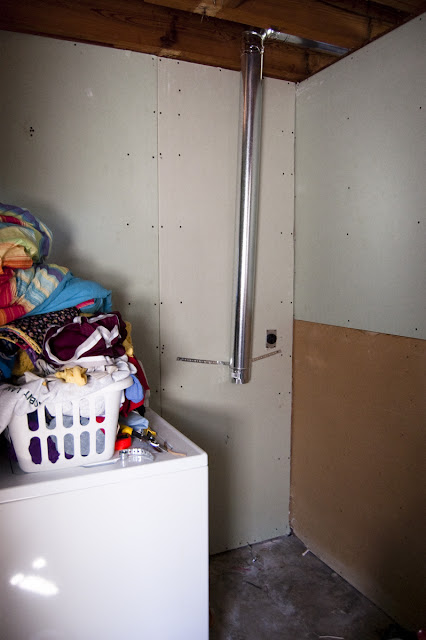
The downward portion that runs to the dryer.
Voila! We have a vent! We will eventually be running some sort of chase around it to hide things but for now it is completely functional. We also had to run a new 220V cable/breaker/dryer receptacle so that our shabby dryer will at least have some electricity to use (probably a good thing…) The dryer was moved successfully and we are very pleased that we are making some progress in the laundry room-to-kitchen conversion. One negative was the fact that we lost some counter space (the dryer top) in our makeshift kitchen but I think we’ll get over it!

Such a tragedy. All our displaced STUFF!
So, that is it for now BUT have no fear, we will updating a lot more frequently in the coming months. We have lots of news and projects to share. On a further note, thank you so much for everyone being so supportive throughout our wedding. You made our wedding so incredibly special and we feel humbled to have such a great group of family and friends.
Till next time…
Kellan and Rebekah Vincent
November 5th, 2010 at 3:46 pm
Welcome home, Rebekah and Kellan! Thanks for your regular updates. I look for them often and really enjoy reading about your latest adventure.
Hope you enjoyed a GREAT honeymoon. It’s good to hear that you’re back and hard at work on the house project.
Have a good weekend. Love,
Aunt Beth & Uncle Roger