Dec
12
2010
Beautiful
Normally we don’t use the blog for this, but its Christmas, and this is very beautiful.
These opera groups did a “flash mob” in a mall food court. Enjoy and Merry Christmas!
Normally we don’t use the blog for this, but its Christmas, and this is very beautiful.
These opera groups did a “flash mob” in a mall food court. Enjoy and Merry Christmas!

before we started anything!
Our house is getting to the point of a face lift rather than a root canal now! By that terrible analogy I mean that anyone can walk into our house now and actually see what we’ve been up to rather than us having to convince people we’ve really and truly have been slaving away during all our weekend extravaganzas. Lately we’ve been doing things like framing out new closets and adding all the electrical work, so unless we show people they can actually turn the switches on and off and the light bulbs correspondingly go on and off (we hope) it kind-of looks like we’ve been working. Anyway, we have been working hard!
We decided it was spring cleaning time. We had tools, materials, and who even knows what else piled so high in one of the bedrooms it looked like we were about ready to have a bonfire. It was a mess. So we started late Friday afternoon with throwing everything off the balcony into another pile below. Maybe not the best approach ever, but it was rather cathartic chunking our junk. So we threw it all away as I would like to think, but its actually sitting in its third (haha) pile now waiting to be dumped (we’ll get to it eventually, right?)
Well, I got to sweep after that which makes me happy because its makes everything so nice and clean as our house can possibly be! Really, its counterproductive, but meh, it makes me feel better.
With all those ramblings, the BIG change we had this weekend was upgrading a normal door and window for a beautiful 6 ft. sliding glass door! It makes for a seriously pretty view onto the balcony. For those of your who don’t know- this balcony is connected to the master bedroom and about the full length of the room, a feature I quite like!
Problem #1 with this project, the door is beautiful, but huge and heavy…. So, me and Kellan- great team that we are ![]() – can’t lift the door with just the two of us and couldn’t fit it in the back of his truck because you can’t lay it down, it has to be upright however you transport it. Well, through Kellan’s company they have a 1-ton truck, which was unfortunately in the shop… Ergo we got it delivered- which was actually a great deal since the delivery rate is flat and so we tacked on 26 more sheets of sheetrock (the stuff that is 70 lb. each- hallelujah).
– can’t lift the door with just the two of us and couldn’t fit it in the back of his truck because you can’t lay it down, it has to be upright however you transport it. Well, through Kellan’s company they have a 1-ton truck, which was unfortunately in the shop… Ergo we got it delivered- which was actually a great deal since the delivery rate is flat and so we tacked on 26 more sheets of sheetrock (the stuff that is 70 lb. each- hallelujah).
Problem #2- we still have to get the 210 lb. door from the ground to the balcony, uh huh. UH HUH. I like the role of cheerleader in times such as these! Well, thanks to Kellan’s guys- the five of them hoisted the big lug onto the deck- and were successful! Woo hoo!

Creation of the hole in progress!
After all that, the construction seemed really easy. There was an existing door and window in the space where the door was going, so before we got the door and everything, me and Kellan knocked those out and all the crappy framing that went along with it. The guy who built the place had some really interesting “techniques”?… Anyway, that was a fairly simple process which messed up my beautifully swept floors (sigh) haha just kidding. The hard part was putting the new header in place. The thing was 6 ft long and who knows how many pounds. It’s a 2×12x72 board nailed to another of the same size and it makes the walls structurally sound. All that to say, we successfully lifted it into place, added the door in the hole, and enjoyed our new vista!!

Ta-da!!!!
Great weekend overall- we got working on the sheetrock afterwards and coated the floors with some more dust….
Oh well! Such is the sweet life!

We like it a lot
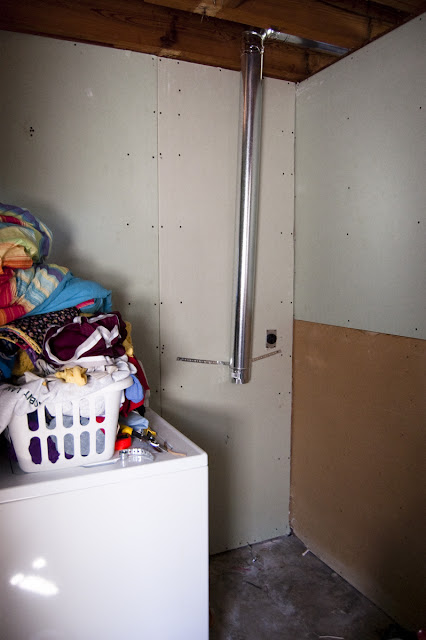
No worries things are fantastic in the Little Blue House! The venting I am referring to is the next major obstacle in renovating our kitchen! The previous owner/builder/designer anticipated building an addition which included a kitchen and living room. While I think it would basically work, we decided to do something differently. What was originally intended to be the laundry room will be converted into a full kitchen. One of the first things I did with the house was to flip around some of the plumbing so the washing machine could be located in a space in the bathroom. The dryer however is a much more tricky proposition.

The before-ish shot. We have the dryer pulled out to evaluate what we need to do
In order to allow the hot air, water and lint from a dryer to not build up inside, you have to vent the dryer to the exterior of the house. While this can be a simple job, there are a couple of complications with this idea. First of all by code you may not use a flexible vent line (used to be super common) to run through the ceiling etc. Secondly you may not use more than 25′ of rigid venting from the dryer to the outside vent. You also must deduct 5′ for every 90 degree elbow joint you use. Now if your dryer is on an exterior wall this is no issue whatsoever. If you are in a single story house this is also not a big deal. In the case of the LBH however it is a two story structure with the washroom towards the center of the floor plan and lacking any forethought from the previous owner of how he would vent anything like the AC or bathroom fan.
What made matters even worse is the fact that the owner tried to cantilever part of the master bedroom balcony by switching the directions of the ceiling joists and adding a structural beam. It might have worked had he known the right proportions needed to create something like that but alas, the balcony had to be supported anyway and the ceiling joists are all messed up. After standing in the future laundry area scratching my head for about an hour I determined there was only one possible way to go and that was definitely pushing the length restriction.
So I set to work installing the vent. One of the first things you have to do is assemble the vent tubing by rolling them up so the edges come together then kinda pushing down on the seam in order to wedge the tab side into the slot side. This actually proved slightly tricky at first to get the hang of but I got it. I then proceeded to drill/cut holes in the rafter blocking and then after a little bit of a second thought, cut a 4.5″ hole in the side of my house! Talk about not being able to go back on something…I found a very nice quality rigid dryer vent that actually looks pretty good so I installed that from the outside of the house through the aforementioned new 4.5″ window in the side of our home. From the inside I decided to put a downward slope in the vent pipe in order to create a bit of drainage in case water ever condenses within the vent which I thought made a lot of sense. After my slopes were all set I assembled 15′ of the vent pipe and used band clamps to secure them then taped up all the seams and connections with TRUE duct tape. True duct tape is actually a foil tape that works a lot better than the plastic stuff, at least for sealing up vent pipes.

Clamped and taped dryer vent!
After some careful maneuvering and making an effort not to knock things off of our shelves by swinging around a 15′x4″ vent, I managed to slide the vent up through the proper ceiling joists, through the blocking and into the receiving tube on the outside vent. Success! From the laundry room side of things i had to cut part of the vent short, add a 90 degree elbow (also taped and clamped) and then run another 5′ of solid pipe down to the center of the dryer’s spot. Success! The vent pretty much lined up perfectly. I proceeded to use plumbers tape/strapping to secure and hang the vent in the ceiling as well as secure it to the wall a bit. While I dont’ have any photo of the finished product result, we ended up using 2′ of flex pipe just to make the connection to the dryer a lot easier.
The downward portion that runs to the dryer.
Voila! We have a vent! We will eventually be running some sort of chase around it to hide things but for now it is completely functional. We also had to run a new 220V cable/breaker/dryer receptacle so that our shabby dryer will at least have some electricity to use (probably a good thing…) The dryer was moved successfully and we are very pleased that we are making some progress in the laundry room-to-kitchen conversion. One negative was the fact that we lost some counter space (the dryer top) in our makeshift kitchen but I think we’ll get over it!

Such a tragedy. All our displaced STUFF!
So, that is it for now BUT have no fear, we will updating a lot more frequently in the coming months. We have lots of news and projects to share. On a further note, thank you so much for everyone being so supportive throughout our wedding. You made our wedding so incredibly special and we feel humbled to have such a great group of family and friends.
Till next time…
Kellan and Rebekah Vincent
So after getting the majority of the exterior insulation in place, it became time to start actually closing things in! For us this is an extremely exciting change in our housing situation. The sooner we get the wall material up, the sooner we will have a master bedroom! Probably the biggest decision in this phase was what to use for our wall materials. I have entertained ideas such as tile, stone, plaster (a special type, very cool), paint, wood etc. before finally settling back on the tried and true sheetrock with a couple of accents most likely in concrete and/or wood. Let me say here that sheet rock, or gypsum board, is not my favorite material in the world. It is brittle and not particularly environmentally friendly. To finish it off well requires a lot of time and patience to get everything smooth without applying a texture. However on its list of benefits is the fact that it has fire retarding abilities and is relatively inexpensive. Also, the plaster I mentioned before required sheetrock to be placed first anyway, which ended up not financially feasible. Personally I like very solid walls along the lines of masonry but that isnt always possible in stick-built homes. The future addition (more on that to come in a later post) will have a bit more masonry to help things a long.
That being said, I worked with what I had. I researched a product called EcoRock (here) which uses 90% less energy to produce. While it seemed like a great product to use, it won’t be available in Texas for quite some time. While I was at it, I also took the time to research various methods of sound transference reduction from room to room and floor to floor. A well sound-insulated house can be very important when living quarters are close in a smaller house like this one. There were a few dedicated products including a special board with layers of gypsum and a barrier in between. These became quite expensive however so I went with a decent affective plan of action: 5/8″ sheetrock (normal is 1/2) with insulation in between all of the rooms. This should give me a decent reduction in sound without being too costly. Downstairs where the entertainment center and everything is located we will probably use a bit more of an aggressive attack such as resilient channel and isolation clips to almost eliminate any foot stomping going on upstairs (more to be discussed when that happens!) Another benefit of using 5/8″ gypsum board is that it is fire rated to at least an hour.
The downside? IT IS HEAVY STUFF!
One 4×8′ sheet weighs about 7olbs. Now, that might not seem like a ton but when you factor in the distinct lack of a stairway in our house currently (the main reason behind an addition) and the fact we have close to 50 sheets to place into the upstairs alone, it is quite a bit. We persevered though and with the help of my dad and one of my best friends Hussain, we got 14 sheets upstairs and 13 sheets on the walls. In order to get them upstairs in the first place my beast of a dad ended up hoisting the panels to me and Hussain, where we had to pull them up onto the back deck. Not particularly fun but it worked.
Now, the *correct* order of drywall is to place the ceilings first then go around and place the wall partitions. This was the plan until we realized something rather depressing; the previous owner didn’t include many of the necessary nailer boards. This meant that it would be nearly impossible to hang the ceilings. Instead, we decided to place the walls but leave a gap at the tops to accommodate the 5/8″ ceiling panels. Before our next round of installation I will make sure we have all the correct nailers so we can get back on track. We got all of them lightly tacked up that day and called it quits. Rebekah and I the next evening spent a couple hours driving the appropriate amount of screws into them so we would hopefully avoid any moisture problems until completed.
That was about the extent of the excitement! Everyone was a huge help and special thanks to Hussain and my dad for their time and help. It is fantastic to see real walls going up in those rooms. Here are a few photos of the current progress!

Rebekah and Oso in the in-progress master!

Closet side of the master. And Oso

Into the hall from a bedroom

The smaller of the two bedrooms. Mostly walled in!

Tools of the trade...
And PS: Roughly THREE WEEKS before our wedding. We absolutely cannot wait ![]()
So, bees were not my friends this week. Maybe if they make me some honey sometime we’d be best buds again. However when they crawl on my ankles and hands, arms, legs, neck…. well… we’re not exactly best buds.
** Just a disclaimer: I love having bees. The bees are really awesome. I think their biology and behavior is simply amazing, and plus they are known to make lovely honey. SO, I do like the bees, this just might be a particularly bitter post.**
Well it all started, Kellan’s parents decided to buy a hive that me and Kellan are going to take care of. And its really cool, right now we have a top bar hive, and this hive is an established langstroth of about 50,000 hard working little lady bees. Well we are excited about having another hive, but it meant that Kellan had to drive to San Marcos to get them. He drove down about 5 in the afternoon because you have to wait till darkish to move the bees. Thats because they’re all back in their cozy hive for the night. Anyway, he didn’t get back to his parents till about 9 which meant we had to move the hive down the driveway, across the creek bed, up the creek bank (which was muddy), down the trail (also possibly muddy), up a step, and across a paddock…. ALL IN THE DARK.
Well, we jumped into our lovely matching bee suits, got the smoker going, and started carrying the hive. We made it across the creek bed ok, regardless of not being able to see. Uh. huh. Sad to say, it goes downhill (yeah you didn’t see that coming) and we slip in the muddy creek bank, and although we never dropped the hive completely, we rattled it pretty good…. and the bees poured out….
After that, there was nothing Kellan could have said to talk sense into my panicked head. I had felt bees ALL over my ankle and buzzing all around me. Right after we rattled the hive Kellan tells me, “Hey, you might feel some bees crawling on you”, while I’m thinking, “NO, really?!” (in a completely facetious manner). Well I got stung a few times on the ankle and after that I don’t remember getting back across the creek bed lol. Well we ended up swatting the bees off of each other and finally running into the house.
All that to say, my ankle had a lot of stings and one sting on my neck. Kellan had at least three on different parts of his body, but probably more he didn’t find. My ankle looks quite lovely now… its all puffy and I actually couldn’t even walk on it the next day. Therefore, I promise never to silently giggle and women whose ankles get swollen when they are pregnant, its seriously painful.
**Side note: Bee stings are actually very beneficial in alleviating arthritis! Its well known around beekeepers that beekeepers never get arthritis. One guy we know just treated his shoulder by grabbing bees in tweezers and sticking them on his shoulder. He got a lot more movement out of it! (Only took 20 stings….) Therefore, I’m hoping my ankle is good for awhile!**
Well, the bees are all safe now with only little harm done. My ankle will not fall off and we will both live to see another day.
If you read the title too quickly you will probably be expecting some sort of dramatic post filled with all sorts juicy gossip but alas, it says insulAting, not insulting….
Have no fear though because insulation can be pretty epic as well. Shards of glass, floating through the air, glistening in the sunlight as they find new and exciting ways of landing in your hair, clothing and eventually embedding themselves into your skin by the thousands causing an itch that can only be described true to form as “thousands of little pieces of glass stabbing into your skin.” As you have probably gathered, I hate the stuff. Putting insulation up on the bottom floor was the very first thing I accomplished when I became steward of the Little Blue House a year ago. It was a no-fun task then, and certainly hasn’t improved! Worth it? Yes, but not fun. I did learn a couple of things from last year…

Our lovely wallpaper now on both floors!
So, with all these new tidbits of insulation knowledge and experience (not to mention with a new slap-stapler, more on the dangers of slap staplers later), Rebekah and I set upon the task of insulating the upstairs. With all the electrical work complete, our goal is to have the drywall put up within the next couple of months which means we would need to insulate all the exterior walls and some of the interior walls (sound proofing) before any of that can happen. Originally I had hoped to have the sheet rock put up by the wedding so we would have a master bedroom but with all the events between now and then, its not looking too probable.
Over a couple of days we got the exterior wall insulation up with very few hitches. We will have to wait to put up the interior wall insulation until after the majority of the drywall is placed. It may not have been the cleanest jobs ever but hopefully it will be covered up very soon. Rebekah did a great job with everything and definitely helped me out a lot.

Rebekah hard at work, complete with slap-stapler and dust mask (safety first!)

Rebekah opening a package of insulation
WARNING ABOUT SLAP STAPLERS: Please keep hands, toes, eyes, fingers, your significant other and any potentially stapled body parts away from a moving slap stapler! Disclaimer: You must have one hand on the slap stapler in order to actually use it…don’t get clever. If you fail to observe these warnings you might just end up hitting yourself in the finger at full hammer-swinging speed causing the underside of your fingernail to hurt beyond belief and turn black and blue. I’m pretty sure I did a good job at causing some damage but as far as I can tell my nail should remain! I’m just thankful I didnt actually hit the staple part on my finger…
Anyway, kind of a dull task to describe, but at least its done! Here are a few more photo highlights…

A shot through the two extra bedrooms. Insulation!

Aren't we adorable all covered in fiberglass?

BTHO In-sul-ation! Whoop!
Hi all! So our latest house building adventure has been the electricity in the upstairs. Here is where we started from: the house has electricity on the bottom floor, with 1 panel, Kellan has added some lights and receptacles (the plugs) to the bathroom, however… there was absolutely no electrical connections for the upstairs. Really, the upstairs only had the studs up for three bedrooms, a small hallway, and two closets. Before we even began the electrical work we built the third closet, a window seat for the master that is going to be absolutely spectacular, and the headboard for the master bedroom.  In this picture, the bay was already built, but we added the section of that crosses straight across for the window seat.
  This is the future headboard! It is slightly wider than the width of the bed. It is wired for sconces on both sides on the headboards. We’re gonna do some sort of stain glass arches, but we’re trying to make those as well. We had to do all the framing first since we have to run all the wires through those boards, it would be hard to return to it later and add it all in.
Anyway! We got onto the electrical work as soon as we finished those small (haha) projects. Well, I was watching Kellan have a go at the lights in the hallway and I said to myself, “I’m bored! I’m gonna learn how to wire the plugs!” So, I grabbed the wiring book Kellan had, read up on it, and in the next 30 minutes I had all 17 receptacles ready to go! Not quite… but, it really was not hard. Kellan helped me with the first couple, but I had a blast wiring all of them! Here is my first plug!!  The hardest part was actually getting the Romex (wire) to the receptacles, its really tightly wound in spirals, so its hard to get it through the all the studs. After that, all that wiring plugs involves is stripping the romex, figuring out which wire in the hot, the ground, and the neutral, and then hooking those wires up to the correct screw on the back of the plug. Thats the basics anyway!
As much as I slaved away, Kellan REALLY got after it. To make it all work, he had to put a subpanel in the hallway t0 meet code for the electricity. The crazy subpanel:  We have 5 breakers for the upstairs. I don’t remember exactly what we combined with which breaker, but Kellan kept all that straight as well as all the stuff he wired! All 3 closets have just a regular light bulb and the 2 spares rooms have are wired for a fan/light combination, which actually require wire slightly different than everything else we used. Other than that, all the other lights are can lights, or recessed lights. Kellan wired 5 can lights for the master ceiling, 2 can lights for the window seat, and 2 can lights for hallway. The can lights:
  The fan and the lights in the master are on dimmers and the 2 lights in the hallway are on a three-way switch. Pretty complicated stuff considering me! The three-way switch in the hallway looked the most complicated, but Kell got it!
Well, we got to the point where all the wires were joined to the breaker and the subpanel was joined to the main panel. SO! Kellan ran upstairs (with the fire extinguisher!) while I stayed downstairs to flip the breaker for the subpanel. I gave him a good countdown, and flipped the breaker, and WOOHOO! That fire extinguisher wasn’t necessary, thank goodness! I joined Kellan upstairs and got to see lots of pretty lights on! The ONLY problem we had was the three-way switch, which is a really complicated one so we were slightly worried. Thankfully, it only required pulling out a switch and tightening some screws. WOOHOO for real. It was really exciting, and definitely a big accomplishment.
So I was sitting at my desk when AJ comes into the office obviously excited about something. While mowing the grass on the property he noticed something that none of us had previously; the mustang grapes that grow throughout the office grounds were fruiting. Upon a further look of the fence line and nearby trees we were astounded by the amounts of fruit that the vines were bearing. AJ and I immediately started coming up with a plan on how to harvest and process the daunting amount of grapes hanging out of the trees. The summer heat would not allow the already ripened grapes to remain much longer.
Our plan was to pick as many as we could reasonably from the ground, then in the following day or two, use ladders to pick the ones in the trees. It took three different ‘attacks’ but the result was worth it! All in all, I believe we picked somewhere in the neighborhood of 12-15 gallons of mustang grapes! To us this was a pretty incredible sight!

The first batch of picked grapes that we temporarily froze
Once off the vines, it was time to figure out what to do with all of the fruit! Mustang grapes are notoriously acidic and capable of burning skin (as Rebekah’s feet later found out). However, they make terrific jellies, jams and wine so we began the process of juicing and macerating our harvest. We decided to make mustang grape jelly, and some mustang wine.
Wine (all types, grape fruit etc.) was originally used as a way to allow juice to store for long periods of time without it spoiling and becoming dangerous to consume. Especially before the ability to sterilize and pasteurize, the natural yeasts on the skins of the fruits would start this process and if exposure to oxygen was minimized, a palatable end product would result. In biblical times they would allow the mix of crushed grapes and juice (called must) to sit in a large vat until eventually transferred to goat skins and sealed containers to minimize spoilage. Our goal with this wine was to bring up the alcohol content just to the point that we can bottle store and keep the wine for an extended period of time without it going bad or if we desire, we can convert it to red wine vinegar (essentially the careful spoiling of wine). Sauerkraut when made properly is actually a fermented product as well, and “keeps” for many of the same reasons that wine does.
The first step in this process was to crush the grapes and create a must. We did a lot of brainstorming but our eventually solution was to use a large metal bucket and crush them in that. The lovely Rebekah volunteered to be the grape crusher and so began the grape stomping process. I think most people are familiar with the classic image of people stomping grapes in a large pail. Well, it was a lot like that, however we learned a couple of things…

Rebekah stomping our grapes!
Once the grapes were turned into must, we put them all in the primary fermenting bucket. This is essentially a food grade plastic bucket with a sealed lid and an airlock. We added a little bit of sugar and yeast to help the process along due to the very low sugar content that mustangs have. Fermentation (pickles, sauerkraut, wine) is really interesting to me due to the mixed amount of sciences you use to create the end product. Its a dynamic mix of chemistry, physics and biology and definitely a challenge!

Must in the primary fermenter
After five days we strained and siphoned the must into the secondary container. This is where malo lactic fermentation occurs, making the juice taste better. We also added a bit more sugar and water at this phase. Specific gravity readings are used to determine approximate alcohol content which is an interesting thing in itself.

Kellan siphoning juice from the primary to the carboy on the ground

The end result of siphoning!
From this point on it is a waiting game. While I believe we’ve been doing things right, we wont know for another month or two. In that time we’ll probably re-rack the wine into a smaller container to allow it to age a bit longer and then eventually bottle everything! Ross (my Dad) and I have had numerous discussions on strategies over the course of the process. Given its our first attempt, who knows what will happen. In a week’s time it has already cleared considerably and gotten darker so fingers crossed! ![]()
Meanwhile, Rebekah and I also decided to work on making some mustang jelly so we picked more grapes and mashed them with a potato masher then strained the mash through a cheese cloth to remove as much of the solids as possible. For jellies to keep, you have to pasteurize everything to prevent bacteria from forming. We added sugar to our raw juice and brought everything up to a quick boil. We then added fruit pectin and sterilized the jars and lids. It was a tedious process but the results were great! We ended up making 20 – 8oz jars of jelly with probably another 10 or so jars worth of juice left over. The jelly is slightly tart with a LOT of flavor. So much better than store bought grape jelly.

The results of our efforts!
Over all I think our foray into grape processing went very well and was a lot of fun. We will update on the progress with house construction very soon!
-k. vincent
I wanted to take the time to briefly tell of our progress with our 15 thousand or so ‘girls’ we have in the back yard! Yes, for those who are wondering, the majority of a bee colony is comprised of worker bees who are all female. Just a little tidbit of information for those taking notes! Our first foray into beekeeping has been an incredibly rewarding and challenging experience. It is a very dynamic mix of biology, chemistry, animal husbandry and stewardship of the tiny creatures.
On April 12th I installed a 3-pound box (between 8-10k bees) into a top bar hive I built. A top bar hive is a bit different from the more common Langstroth hives people are more familiar with. Instead of having frames installed in the hive with a comb foundation already created, top bar hives require the bees to build and arrange their own comb by attaching it to the bottoms of the wood top bars. The comb is created by bees “festooning” or hanging from the bars in sheets grabbing on to one another and passing the wax that the bees create on their abdomen to the bees at the top who chew it up and place it. While the process seems rather complicated, its tremendous how quickly they can build, with entire combs being ‘pulled’ in a matter of days.
Since the installment of the package, we now have 12 fully pulled bars, with 2 more in progress. Early on there were some problems with establishment of a brood nest (where all the eggs are laid). While I’m not sure exactly the reasons behind why there was not a very strong build up at the beginning, there was definitely a decrease in population over the first month. Eventually the hive got up and running fully, and probably has between 15-20k bees.
As far as I can tell we have had 3 different queens in the hive. The original packaged queen got superseded within the first 6 weeks. The resulting queen was very quickly replaced, and now we are on our third. On a very exciting note, we have actually seen the queen within the hive this last week! She’s quite large so its a bit astonishing that we have not seen her till now.
Currently it is the hottest part of the summer in Texas and the amount of wildflowers and ornamental flowers blooming is in a dearth season. There will be another honey flow season once things cool down and our second growth season kicks in. I am hoping to really see a build up of comb, brood, and honey this next growth season to make sure they will last through the winter.
Anyway, I figured I would make a note of our first beekeeping season so far in order to not only hopefully entertain our readers, but to keep notes on what we are observing. Rebekah is becoming quite the beekeeper herself and has been able assist me a few times now. Eventually, I hope to have several hives out at the family farm! We also have a couple of clients that want one next spring as well. Could be fun ![]()
Here are a few photos from our last hive inspection…

Rebekah with her smoker!

Lots of bees
Well it all started when I left. But only for my study abroad trip to Ecuador! It was extremely sad to leave, and while we found ways to communicate, Kellan was so very patient the whole time I was gone. A couple months later Kellan told me he was going to come visit me! I was thrilled and started planning all our sight-seeing for around Quito. I gave Kellan a basic idea of the stuff we would do, and possibly could do. These ideas obviously came in handy!
Soon after Kellan arrived we decided we would do a lot of the “touristy” things in one day. So we headed out of Quito to la Mitad del Mundo, or the Equator line! It took the majority of the day as you have to travel a small while to get to the touristy equator line. I remember while we were on the tour little things would set Kellan’s nerves off and he would just act sheepish in general, which is quite different for my normally suave man! I think we finished at la Mitad del Mundo at about 1 or 2. We were catching a night bus that evening to leave for the coast, so I told Kellan we wouldn’t have time to go up the Teleferico, which is a gondola that runs up the side of a mountain for a beautiful view of Quito. I remember Kellan’s response was something like, “well, ok, I guess…” Which didn’t make alot of sense to me because I didn’t know the Teleferico was that big of a deal. Well all that to say, we figured out we might as well go up there since we didn’t have much else to do in that time. This made for a very happy Kellan.
The Teleferico is quite popular even for Ecuadorians so when we arrived at the ticket booth the place was packed. Eventually we got our tickets and headed over to get in the gondola, an enclosed cart made for six people. Well, we got to the front of the line and the place had become suddenly deserted. So we settled in and I happily blabbered about how nice it was to have our own cart. I noticed Kellan squirming but continued to chat it up when all the sudden he was kneeling in front of me! I couldn’t believe it, and I know my head went a little fuzzy with happiness, but it sure didn’t take me long to figure out what was happening! So as the gondola continues rising, Kellan says something like, “I had an idea for our next adventure” to which I asked “what?” and he asked, “will you marry me?” with a great big smile on his face ![]() I returned that big smile, added some tears, nodded furiously, and then blurted out “yesfsffsffffff” (I’m quite eloquent). Needless to say I was a bit teary eyed and had a hard time talking, but Kellan got the point and we continued our ride into the sky extremely happily and joyously.
I returned that big smile, added some tears, nodded furiously, and then blurted out “yesfsffsffffff” (I’m quite eloquent). Needless to say I was a bit teary eyed and had a hard time talking, but Kellan got the point and we continued our ride into the sky extremely happily and joyously.
You could say it was one of those stories where we rode of into the sunset. Actually, since we went late in the day clouds were rolling in (they normally do that time of day in Quito), and so, “we rode up, up, and away into the clouds”, I’m convinced it was cloud 9!